This post may contain affiliate links. As an Amazon Associate, I earn from qualifying purchases.
Today, I’m dedicating this post to making puff pastry from scratch with this puff pastry tutorial. Sometimes the best way to learn is to teach. This tutorial includes:
- The biggest takeaway lessons
- Step-by-Step breakdown of the recipe
- Step-by-Step Video
Subscribers get access to my entire resource library, which includes a downloadable Puff Pastry Tutorial Checklist and Worksheet. It makes those of us who like to keep track of everything and who are visual learners happy (me!).
I’ll be devoting a whole other post to baking with puff pastry because that, in my personal experience, is where most of the difficulty actually is.

If you want to just watch the video, it’s down at the bottom with the recipe.
Jump to RecipeThe Great British Baking Show
You guys. I have finally caught the bug that is The Great British Baking Show. It is so addicting. I make things from scratch a lot actually. It’s my preferred way to enjoy food. But this show has made me want to slow down even more and dive into some projects I keep setting aside, like homemade puff pastry.
Sometimes I set a lot of stuff aside because I decide that it’s just not “for the blog.” But I feel like most of you have more than the average baking and cooking knowledge and if you don’t, then you’re the type to enjoy a puff pastry tutorial. Am I right? Please tell me I’m right.
Biggest Take Away Lessons I Learned Making Puff Pastry from Scratch
This was a learning process for me. But making puff pastry isn’t as hard as I thought. Here are the biggest lessons I learned:
- Have confidence. Doubting yourself and your instincts will get you failed puff pastry dough. Yes, following instructions is important, but every time I ONLY followed instructions something went a little screwy.
- There are some steps that aren’t as important. What you really want to focus on is:
- Keeping that butter cold
- Completing a total of 6 turns
- Resting the dough long enough between turns and before baking it
- Don’t give up! There will be multiple times when you think that you’ve messed up certain steps. And you probably have. But keep going. Because even when you don’t do everything 100% correct, it will still end up tasting amazing.

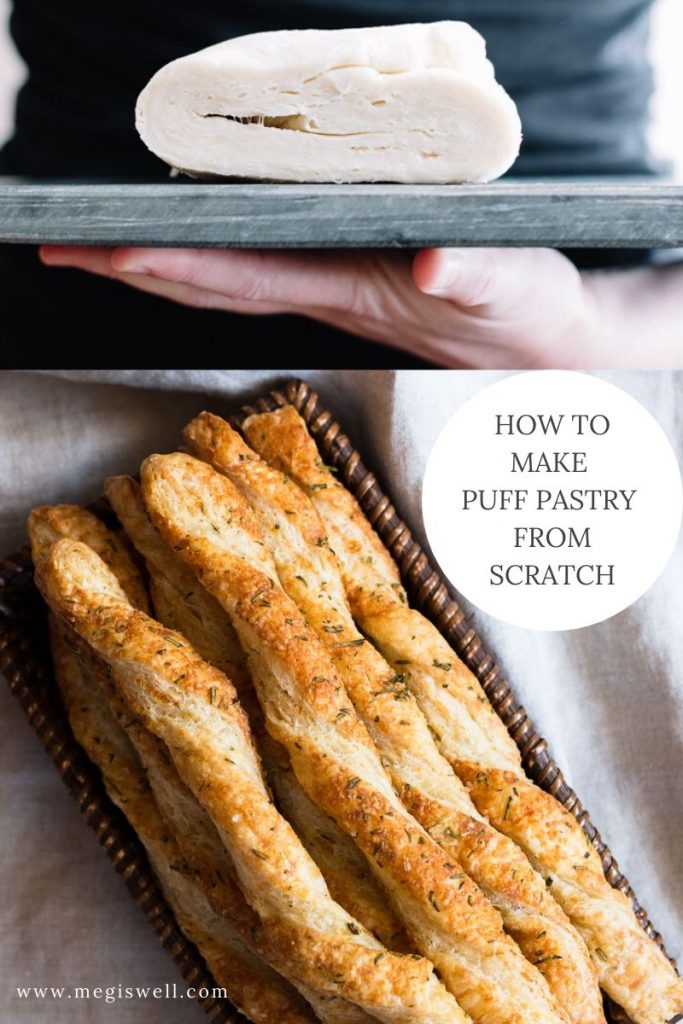
Puff Pastry Tutorial
Puff Pastry is…
Puff pastry is the result of trapping super thin layers of fatty butter in-between layers of lean dough. If you do this correctly when the puff pastry bakes in the oven the steam will evaporate from the butter and dough, lifting it upwards. The butter will melt into the dough, creating all those crisp and flakey golden layers.
The Recipe
Most recipes wouldn’t give measured amounts because ideally, you would weigh an equal amount of flour and butter. But I’ve yet to acquire a kitchen scale. I finally found Emma Christensen’s wonderful cooking lesson “How to Make Puff Pastry From Scratch” for The Kitchn.
Her recipe calls for 2 cups all-purpose flour, 1 teaspoon salt, 2/3 cups ice cold water, and 8 ounces (2 sticks) of unsalted butter. That’s it. Easy right?
Outside of that, most of the recipes I’ve read on puff pastry have the exact same method. If it ain’t broke, don’t fix it.
Making the fatty butter block

The main goal: keep the butter cold but pliable. You want the butter to be able to fold over without cracking but still be cold enough not to melt. Melting should only occur once the puff pastry is in the oven.
Some people create the butter block after they make the lean dough. I like doing it before and personally get better results. I felt like letting the butter block rest for only 10 minutes made it too soft and I wasn’t able to do the turns properly.
Aim to have both the butter and dough the same consistency: chilled but not hard.
- Sprinkle two sticks of butter with 1 teaspoon of flour. Pound the butter with a rolling pin (a French one without handles or a spinner). Flour your rolling pin if necessary.
- Use a pastry scraper to gather up the butter again. Avoid handling it with your hand, because that will soften the butter.
- Keep sprinkling 1 teaspoon of flour, pounding, and gathering butter until the butter is pliable and doesn’t break when you fold it over.
- Shape the butter into a 4×4-inch square, wrap in plastic, and refrigerate while you prepare and rest the lean dough.
Tips: handle the butter as little as possible to avoid it getting softer. Shaping it into a 4×4-inch square is easier when you do it on the plastic wrap you’ll wrap it in.
Making the fatless “lean” dough

The main goal: think fluffing not kneading. You don’t want too much gluten to form. It will be shaggy, messy, and ugly. Don’t be tempted to knead it and make it all smooth.
- Dump flour and salt onto a clean smooth surface and toss to mix.
- Form a mound with a little dip in it. Sprinkle 1 tablespoon of ice water into the dip and fluff with you fingers in a scooping motion.
- Gather the flour back into a mound and repeat until the flour is clumping together in large pieces and holds together when pressed.
- It will be shaggy and look really messy. Press the dough into a square and wrap it in plastic. Refrigerate for 30 minutes.
Tips:
- Just because the recipe says 2/3 cups water doesn’t mean you will be using all of it. You go until the dough can be held together not until all the water is used.
- You want the dough pretty dry but not too dry. I had the most difficulty with this. If it’s too dry, parts of the dough will be dry and flakey and not able to roll together. Cold butter sneaks past those dry cracks super fast.
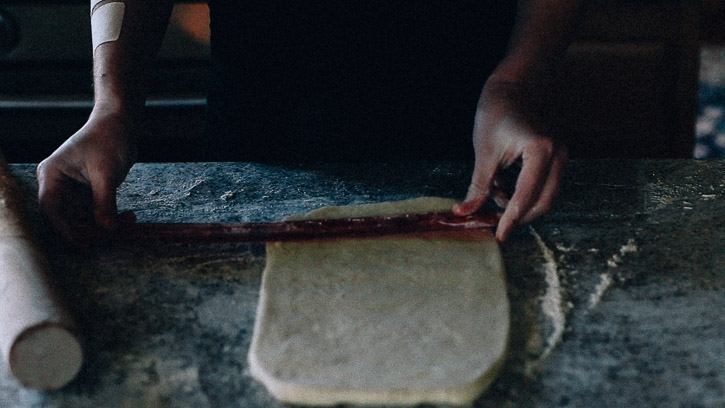
Wrapping the butter in a lean dough package

The main goal: wrapping the butter up tight.
- Remove the dough from the fridge, unwrap it, and roll it out into a 7-inch square.
- Place the square of butter on top of the dough at a 90-degree angle. This part always confuses me. Basically the square of butter looks like a diamond inside a square.
- Pull the 4 corners of the dough into the center of the butter square so that they meet in the middle. Pinch to seal.
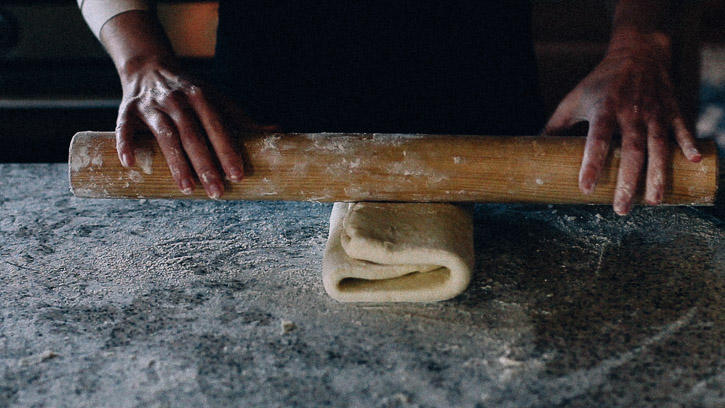
Turning the dough
What is a “turn”?
A “turn” is one round of rolling the dough out and then folding it. It is also called lamination. You want to do a total of 6 turns but you don’t do them all at once. You have to let the dough rest between turns.
The main goal: creating the many SEPARATE layers of dough and fat.

Deciding how many turns to do between rests is up to you. Don’t do more than two. If it is particularly hot, this raises the risk of the butter melting into the layers of dough. In this case, rest the dough between every turn.
30 minutes is an acceptable rest time between turns. But after the last turn, you need to let the dough rest for AT LEAST 1 HOUR. Ideally, you want to let the dough rest overnight or for 24 hours.
First Turn
- Lightly flour the work surface. Flip the dough and butter package so that the seams are down.
- Roll out into a rectangle measuring 12 inches long by 6 inches wide.
- Tips for rolling out: ideally, you want to only roll the dough length-wise, extending the dough in length only. Try to keep the width of the dough the same throughout the entire process, without rolling it out to increase the width at all.
- Don’t be super obsessed with the width measurement. If you’re not careful, you can stretch out the dough too thinly too soon, making it easy for the butter to seep through the dough destroying your layers.
- Fold the top down towards the middle and then fold the bottom over the folded top-you are folding a dough letter!
- When folding, try to get the edges lying right on top of each other.
- Depending on how hot your kitchen is and what surface you are working on, you may need to refrigerate the dough after every turn rather than after every two turns.
- Signs the butter is too warm: it starts to pop through the lean dough or your dough is sticky.
Second Turn
- Rotate the dough so it looks like a book about to be opened (seam is on the left, the “page” or dough edge is on the right).
- Roll out into a rectangle measuring 12 inches long by 6 inches wide.
- Fold it like a letter again.
- Push your finger into the dough on the edge, making two dents to mark that you’ve done 2 turns. Wrap the dough in plastic and refrigerate for 30 minutes.
Third and Fourth Turns
Do two more turns. Make 4 dents on the edge of the dough, wrap in plastic wrap and refrigerate for 30 minutes again.
Fifth and Sixth Turns
Do a final two more turns, making the total 6. Wrap in plastic and chill for at least 60 minutes or overnight.
Storage
Puff pastry is best used fresh but it can be kept for several days in the fridge. If you are going to freeze your puff pastry dough, complete 4 turns and wrap the dough in plastic wrap and tin foil. Thaw overnight in the fridge and then do turns 5 and 6 before baking with it.
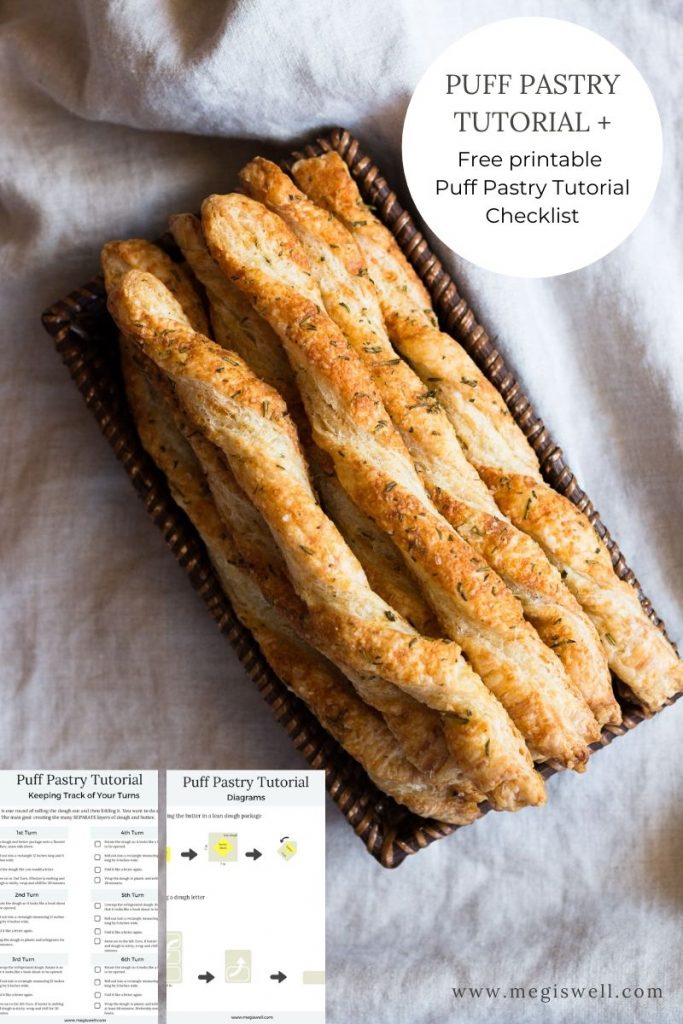
Puff Pastry Tutorial Checklist
After making puff pastry four times in a row, I developed a checklist to keep track of all the turns. I tried leaving little dents on the edge of the dough but that method was way too forgettable.
I also made some diagrams for more visual learners who read, “place the square of butter on top of the dough at a 90-degree angle,” and scratch their heads. That’s me.

Subscribe to my email updates if you want to get your hands on it!
Would I make puff pastry from scratch again?
Hell yes I would. But that’s just me. Here’s why I would do it again:
- There are short periods of labor-intensive work but there is also lots of rest time, where you can watch TV or read a book.
- Even though it’s hard to get 100% perfect, even imperfect results taste amazing.
- You feel a sense of accomplishment.
- It tastes better. Or I should say, people perceive it as tasting better. I’ve cooked with store-bought puff pastry a lot but homemade gets more groans of delight.

Puff Pastry Tutorial – How to Make Puff Pastry From Scratch
Ingredients
- 2 cups flour + extra for dusting
- 1 teaspoon fine sea salt or table salt
- 2/3 cup ice water
- 8 ounces unsalted butter 2 sticks
Instructions
Making the Butter Block
- Sprinkle two sticks of butter with 1 teaspoon of flour.
- Pound the butter with a rolling pin (a French one without handles or a spinner). Flour your rolling pin if necessary.
- Use a pastry scraper to gather up the butter again. Avoid handling it with your hand, because that will soften the butter.
- Keep sprinkling 1 teaspoon of flour, pounding, and gathering butter until the butter is pliable and doesn’t break when you fold it over.
- Shape the butter into a 4×4-inch square, wrap in plastic, and refrigerate for at least 10 minutes.
Making the Lean Dough
- Dump flour and salt onto a clean smooth surface and toss to mix. Form a mound with a little dip in it.
- Sprinkle 1 tablespoon of ice water into the dip and fluff with you fingers in a scooping motion.
- Gather the flour back into a mound and repeat until the flour is clumping together in large pieces and holds together when pressed. It will be shaggy and look really messy. You don’t want it to be dry and flakey though-even cold butter will sneak past dry cracks in the dough.
- Press the dough into a square and wrap it in plastic. Refrigerate for 30 minutes.
Wrapping the Butter Block in a Lean Dough Package
- Remove the dough from the fridge, unwrap it, and roll it out into a 7-inch square.
- Place the square of butter on top of the dough at a 90-degree angle. This part always confuses me. Basically, the square of butter looks like a diamond inside a square.
- Pull the 4 corners of the dough into the center of the butter square so that they meet in the middle. Pinch to seal.
First Turn
- Lightly flour the work surface. Flip the dough and butter package so that the seams are down.
- Roll out into a rectangle measuring 12 inches long by 6 inches wide. Tips for rolling out: ideally, you want to only roll the dough length-wise, extending the dough in length only. Try to keep the width of the dough the same throughout the entire process, without rolling it out to increase the width at all.
- Fold the top down towards the middle and then fold the bottom over the folded top. You are folding a dough letter! Depending on how hot your kitchen is and what surface you are working on, you may need to refrigerate the dough after every turn rather than after every two turns. Signs that indicate it’s too warm: the butter starts to pop through the lean dough or your dough is sticky.
Second Turn
- Rotate the dough so it looks like a book about to be opened (seam is on the left, the “page” or dough edge is on the right).
- Roll out into a rectangle measuring 12 inches long by 6 inches wide.
- Fold it like a letter again.
- Push your finger into the dough at the edge, making two dents to mark that you’ve done 2 turns. Wrap the dough in plastic and refrigerate for 30 minutes.
Third and Fourth Turns
- Do two more turns. Make 4 dents on the edge of the dough, wrap in plastic wrap and refrigerate for 30 minutes again.
Fifth and Sixth Turns
- Do a final two more turns, making the total 6. Wrap in plastic and chill for at least 60 minutes or overnight.
Storage
- Puff pastry is best used fresh but it can be kept several days in the fridge before using it.
- If you are going to freeze your puff pastry dough, complete 4 turns and wrap the dough in plastic wrap and tin foil. Thaw overnight in the fridge and then do turns 5 and 6 before baking with it.

I’ve been watching the Great British Baking Show too! I’ve never made puff pastry from scratch, but since I do most other things from scratch, I’lll have to try this! Thanks!
Isn’t it addicting! And yes, I figured I should just give it a try since I generally make everything from scratch anyway.
You are making puff pastry from scratch!!! Oh my goodness, girl!!! This is beyond awesome. I especially love the clip as it makes me feel like I, too, maybe, could do it. Did I mention I am a disaster in term of bread, pie and alike. Nevertheless, I appreciate your post very much. xoxo
Haha, thanks, Pang! I’m sure you’re not a disaster and could tackle anything you set your mind too!
I LOVE The Great British Baking Show. Seriously addicting and I love the variety of recipes on there! This tutorial is fabulous. I’ve made puff pastry once, in school. I remember whacking that butter with a rolling pin! Lol. It’s a lot of work, but not that hard and totally worth it. And this is key “Because even when you don’t do everything 100% correct, it will still end up tasting amazing.”
Also, unrelated but I love your logo! Is it new or is my memory just horrible (likely).
Thanks Olivia! It’s semi-new. I think I put it up in January maybe? It’s kind of sneaky. I’ve had a lot of people suddenly notice it!
I know! I’ve learned so much watching it and I’ve never heard of so many of the recipes. Whacking the butter is the most fun for me, it helps get all that suppressed aggression out! Glad you agree that it’s worth it! Lol, I was afraid people would roll their eyes and say “this girl’s crazy.”
I’ve ALWAYS wanted to know how to make this, and your photos are so inspiring!
I love puff pastry but man is it a workout, you are a boss in the kitchen for making your own puff pastry! I learned how to make it in culinary school and I don’t think I’ve made it again since. PROPS to your 🙂
Haha, yes it’s a total arm workout! I needed to build up some muscle though so it’s a good thing. Thanks, Andrea!
You’re totally my hero… Pastry and me don’t get along… do you remember the scene in Julie & Julia where Julie was on the kitchen floor in tears? That’s what happened the last time I tried to make pastry. I might give it another go- I love puff pastry and that’s what I’d start with!!
Thanks, Sarah! But, I get it, that used to be me too! I don’t know, something has changed the past few years and it’s now become really relaxing. I think it’s because I’ve come to like how it’s not really about the recipe but about the feel of it. And I’ve just accepted that it won’t be perfect but it will still taste good.
This is such a clear, well laid out guide. And the photos are a great help.
I’m glad! I desperately needed visuals as I was learning so I’m glad it helps!
WOW WOW WOW! You did it so perfectly. Extremely motivating Meg 🙂 I might make my own puff pastry some day!
Thanks so much Kankana!
I was hoping I would a chance to get back here and check out your post! I have always wanted to try puff pastry, but have always been a little intimidated! Thanks for the thorough tutorial! I may have to give it try! You make it look easy!
Thanks Beth! I hope this tutorial is helpful if you ever do give it a try some day!
I’ve tried several times but i failed each time… I mean, the layers are not comming out and its not flaky rather its heavy hard
I’m sorry about that! Usually, if pastry comes out hard it means it’s been overhandled. When this has happened to me, I’ve used too much flour during the process in an effort to stop the dough from sticking, which causes a cascade effect, reducing the amount of fat in the dough, eliminating layers, and over strengthening the gluten strands (which causes the dough to seize up and be very dense and heavy).